


Eletechsup Original Factory Official Store
12V 433M RF Wireless Adjustable Delay time Motor Reverse Polarity Rotation RS360
12V 433M RF Wireless Adjustable Delay time Motor Reverse Polarity Rotation RS360
Couldn't load pickup availability

Wiring Diagram 2:
DC 1-48V OR AC 85-265V control circuit,Wiring diagram below(Note:If not DC 12V load, need another DC 12V power supply). "LOAD" may be LED lights, fans, motors and other DC AC equipment


1 Operating voltage: DC 9-13V (recommended DC 12V , 5V version can be customized if conntact )
2 Operating Current: All relays close,about 14MA; one relay open,about 43MA;two relay open,about 71MA
3 Operating frequency: 433.92MHz (315M version can be customized)
4 Receiver sensitivity : -108dBm
5 Decode : learning code, can be adapted EV1527 / PT2262(Click here)and compatible remote control, you can store up to 16 remote control
6 Work mode : Non-locking (Momentary is defult),Self-locking (Toggle),Inter-locking (Latch), Delay;Each channel independently set the Work mode; 500,000 seconds maximum delay
7 Size(Including housing): 75*54*28mm;
8 Relay Maximum load(Recommended<5A):10A/250VAC,10A/125VAC,10A/30VDC, 10A/28VDC ,10A/12VDC .
1: Receiver Mother board have a learning key , if the remote is lost , must buy EV1527 OR Pt2262 remotes to re-learn;

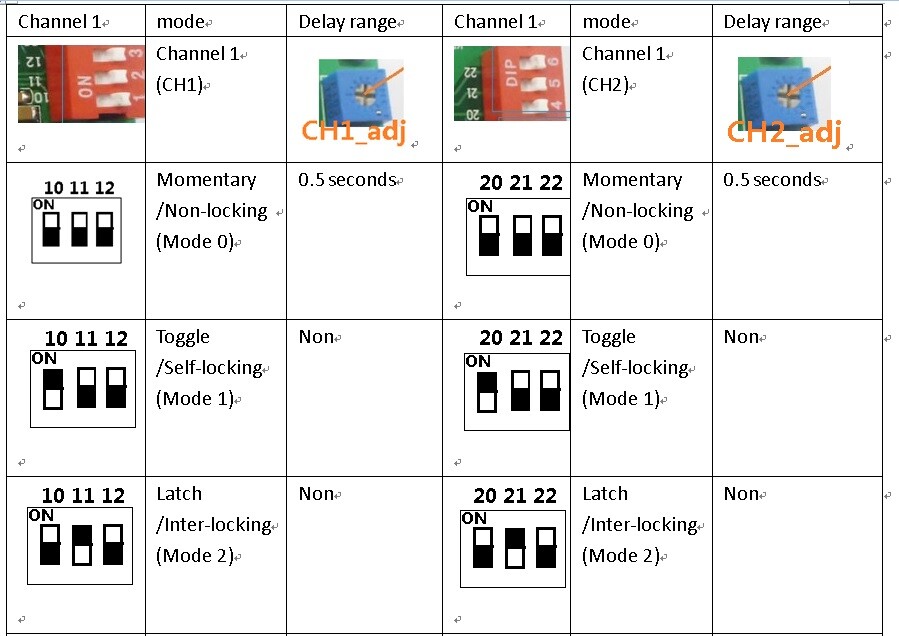

1: Each Channel have 4 working mode : Delay time , Toggle mode (singnal Self-locking), Momentary Mode ( singnal None-locking) , Latch mode (singnal Inter-locking) .
2: working mode of each channel need to be set individually , 2 channels can have 10 different working mode combinenatoin ,
Detail :
one channel is Momentary , the other channel is Latch ;
one channel is Momentary , the other channel is Momentary ;
one channel is Momentary , the other channel is Toggle ;
oone channel is Momentary , the other channel is Delay time ;
one channel is Toogle , the other channel is Delay Time ;
one channel is Toogle , the other channel is Latch ;
one channel is Toogle , the other channel is Toggle ;
one channel is Latch , the other channel is Delay Time ;
one channel is Latch , the other channel is Latch ;
one channel is Delay time , the other channel is Delay Time ;
3: Time of each delay mode is proportionally increased. For example, you want to channel 1 to delay 50 seconds , 500seconds and 5000 seconds, you can first seting channel 1 is set to "delay 1 (Delay Mode 3), turn around (CH1_adj) adjustable resistance, so that channel 1 delay 50 seconds; if the mode is set to "delay 2 (mode 4), the delay time becomes 500 seconds, if the mode is set to" delay 3 (mode 5), the delay time becomes 5000 seconds
4 With a suitable screwdriver and gently rotating adjustable resistance;Clockwise, increasing delay,Counter-clockwise, the delay is reduced
NO : Relay normally open contact
COM : Relay common contact
NC : Relay normally closed contact
Open : NO connection COM, NC disconnect COM
Close : NO disconnect COM, NC connection COM
Momentary : Press the Transmitter button A, the receiver Channel 1 is Open, release button A; the receiver Channel 1 is Close, the same as B ,Every Channel is Independent ;
Toggle : Press transmitter button A for 1 time , the receiver Channel 1 is Open, press button A again, the receiver Channel 1 is Close, the same as B. Every Channel is Independent ;
Latched : Press transmitter button A, the receiver Channel 1 is Open, the Channel 2 is Close.
Press transmitter button B, the receiver Channel 2 is Open, the Channel 1 is Close.
Delay : Press the Transmitter button A, the receiver Channel 1 is Open,After a set time delay, the receiver Channel 1 is Close, the same as B ,Every Channel is Independent;
If during the delay, press the button of Transmitter, delay start again; if the delay period, press and hold the button of Transmitter 3-4 seconds, the receiver controller stops the delay, the relay Close
Under normal operating mode, LED will be lit, when receives a valid remote control (EV1527 / PT2262) button values, LED flashes
Clean code: press the button and held down, LED off, LED will light about 8 seconds later, clean code is completed (Note: After performing clean code previously stored remote control value does not exist)
Step 1 (into the learning mode): Press the button (about 1 second), LED off;
Step 2 (adapter channel 1): Then press the first button on the remote control, LED flashes four times off, then learning the first button value
Step 3 (Adaptation Channel 2): Then press the second button on the remote control, LED flashes four times brighter, then learned two key values
Features / Specifications :
Technical Data :


