Eletechsup Original Factory Official Store
AK029Arduino Relay Kit 433MHz UART Remote Control Wireless Controler for MEGA2560
AK029Arduino Relay Kit 433MHz UART Remote Control Wireless Controler for MEGA2560
SKU:AK029*1+BX003*1
1010 in stock
Regular price
$17.98
Regular price
$17.98
Sale price
$17.98
Unit price
per
Couldn't load pickup availability
Product Name:Arduino Relay Kit 433MHz UART Remote Control Wireless Controler for UNO MEGA2560
We provide for ARDUINO Demo sample code , please contact after your order at Ebay message .
Qty:
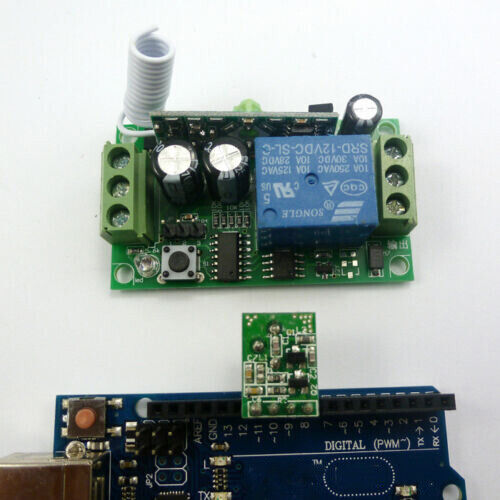
1 PCS 433M Wireless transmitter module(Does not include Arduino UNO);
1 PCS 433M 1 channels relay switch;
433M Wireless transmitter module & 433M 1 channels relay switch
Wireless transmitter module connected with Arduino uno(replace PT2262 Remote Keyfob)
USE:
Software control:
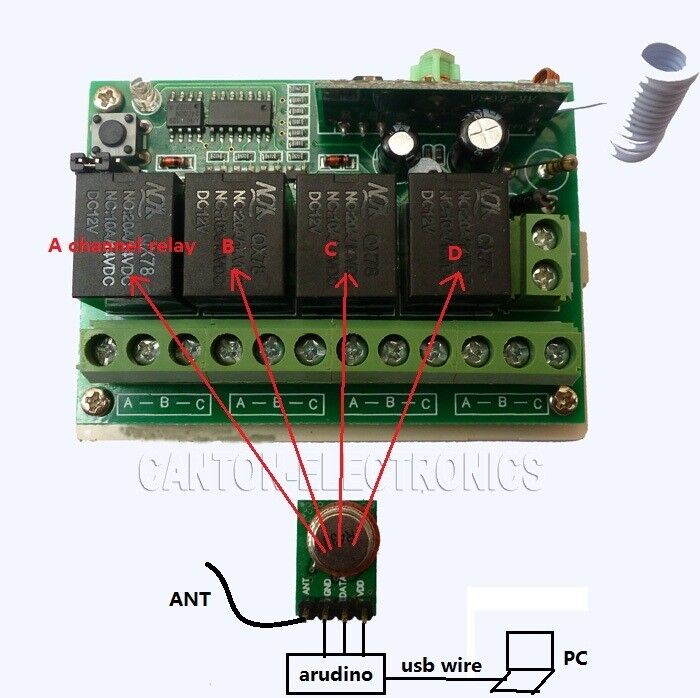
How to use:send "a" trigger A channel relay.
arduino core fragment(complete code through ebay message Request):
//Author: cantone-electonics
//Arduino 1.0
//Arduino uno R3
//Making a wireless remote control with arduino
const int data_out = 2;//encoder DOUT
//LED pin,When receiving the key from the serial port, LED flash
const int ledPin = 13; //LED pin
// OSC Resistance is 3.3M
const int Osc_4xCycle = 359; //4 oscillating time periods
const int Osc_12xCycle = 1078;//12 oscillating time periods
unsigned long Temporary[3];//Temporary storage unit
...
//send:8 Address Bits, 4 Data Bits, Sync bit
void send_data()
void setup() {
// initialize the LED pin as an output:
pinMode(ledPin, OUTPUT);
// initialize the encoder DOUT pin as an output
pinMode(data_out, OUTPUT);
Serial.begin(9600);
}
void loop()
{
...
while(1)
{
//get key from pc serial port
while (Serial.available() > 0)
{
keydata = Serial.read();
receive_flag = 1;
delay(2);
}
if(receive_flag == 1)//if get key,send key
{
receive_flag = 0;
if((keydata == 'a') || (keydata == 'A'))//trigger A channel relay.
{
Temporary[2] = 0xC0;// 0xC0 is A button key
digitalWrite(ledPin, HIGH);//Turn on led
send_data();//send code word
Serial.println(".....trigger A channel relay.....");
}
else if((keydata == 'b') || (keydata == 'B'))//trigger B channel relay.
{
Temporary[2] = 0x30;// 0x30 is B button key
digitalWrite(ledPin, HIGH);//Turn on led
send_data();//send code word
Serial.println(".....trigger B channel relay.....");
}
else if((keydata == 'c') || (keydata == 'C'))//trigger C channel relay.
{
Temporary[2] = 0x0C;// 0x0C is C button key
digitalWrite(ledPin, HIGH);//Turn on led
send_data();//send code word
Serial.println(".....trigger C channel relay.....");
}
else if((keydata == 'd') || (keydata == 'D'))//trigger D channel relay.
{
Temporary[2] = 0x03;// 0x03 is D button key
digitalWrite(ledPin, HIGH);//Turn on led
send_data();//send code word
Serial.println(".....trigger D channel relay.....");
}
...
}
}
Output:
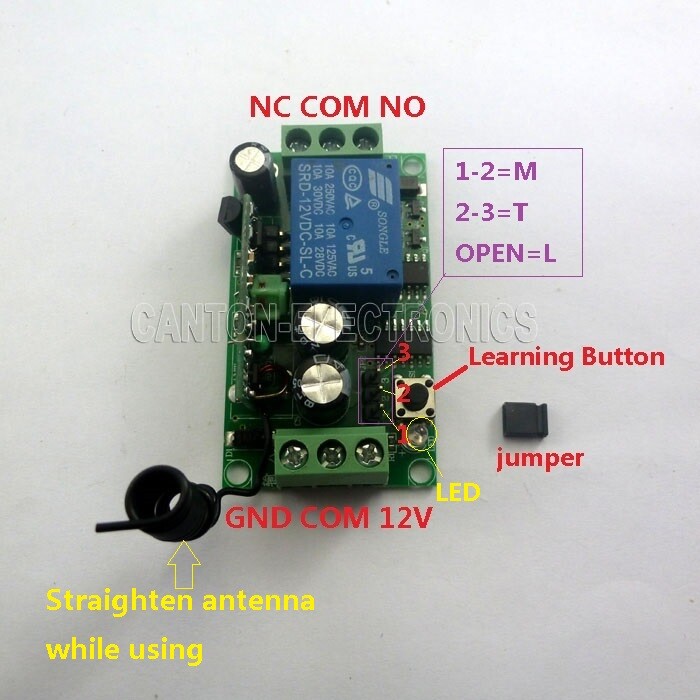
A.singnal Inter-locking (Latch)----connect 2 and 3 ;
B.singnal Self-locking (Toggle) ---- connect 1 and 2 ;
C.singnal Non-locking (Momentary ) ---- All disconnect ;
· Toggle : Press->On; Press again->Off ;
· Latched : Press->On; Press other button->Off ;
· Momentary : Press and hold->On; Release->Off ;
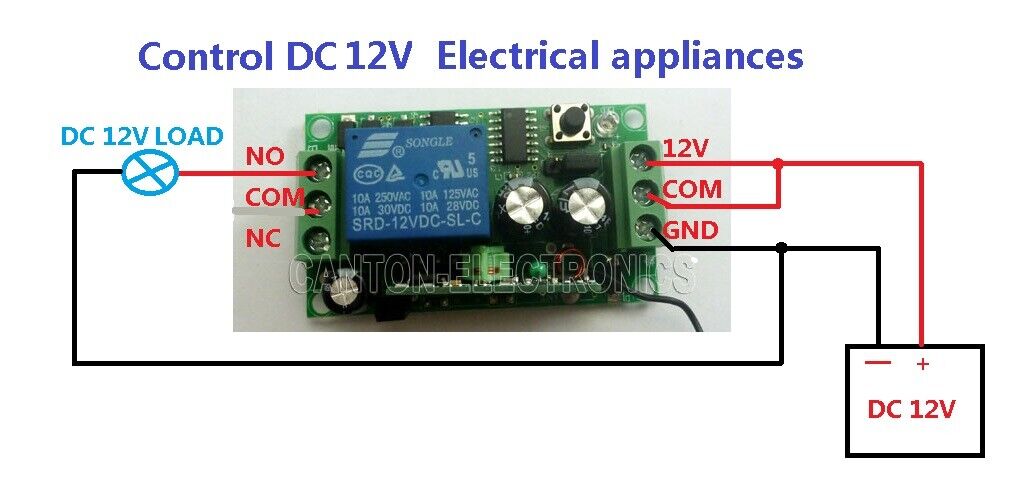
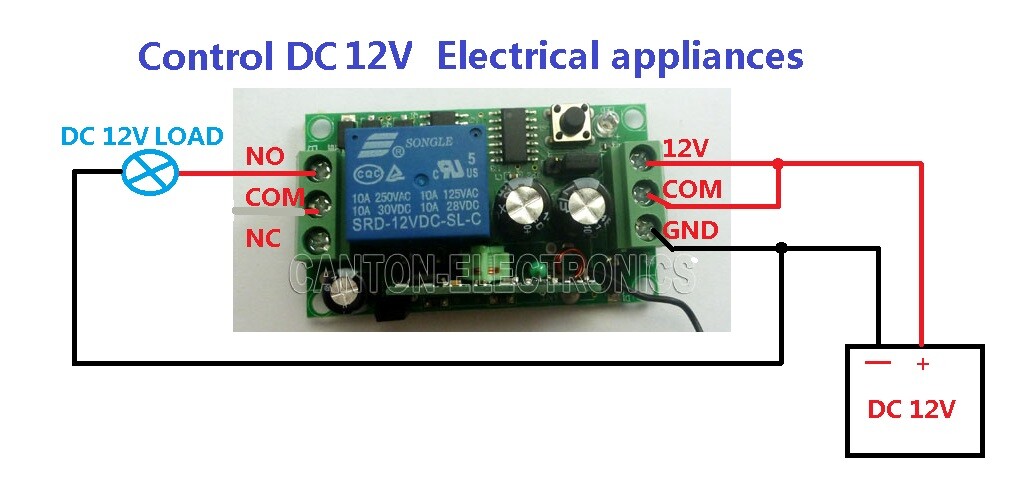
Wiring Diagram 1:
DC 12V control circuit,Wiring diagram below. "LOAD" may be LED lights, fans, motors and other DC 12V
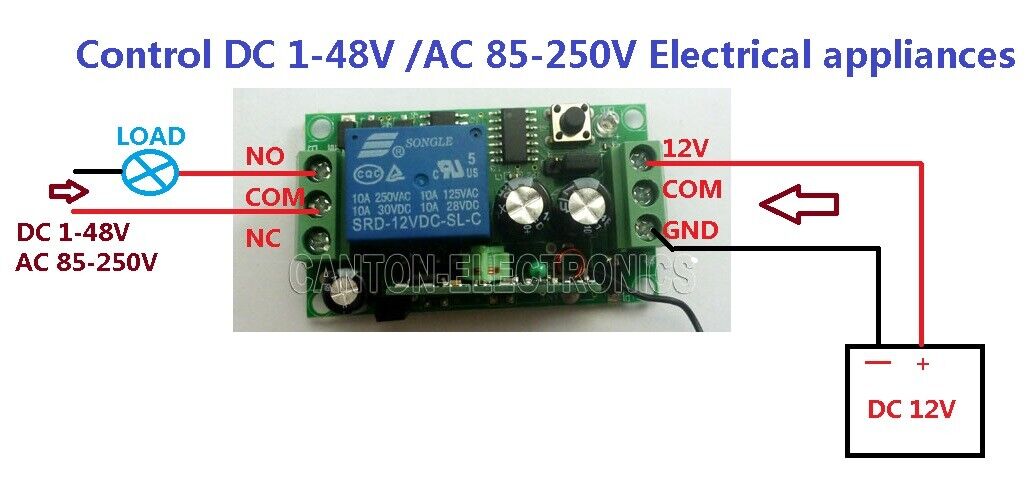
Wiring Diagram 2:
DC 1-48V OR AC 85-265V control circuit,Wiring diagram below(Note:If not DC 12V load, need another DC 12V power supply). "LOAD" may be LED lights, fans, motors and other DC AC equipment